The "regular" or same network player synchronization builds on Broadsign's existing trigger feature. It allows synchronized playback between players that are on a single LAN. Playback on setups with regular triggers occurs when the trigger is received.
Tip: If you need to sync playback between players that are on different LANs, see 3G Synchronization.
Prerequisites
Network Synchronization is an advanced feature. We recommend that you be familiar with the following:
Workflow
In general, the workflow to execute Network sync is:
- Create two loop policies (Master and Slave)
- Add two display units (Master and Slave)
- Create a configuration profile
- Book campaigns
Note: It is possible to execute Network sync with one campaign or two separate campaigns.
Notes
-
In this tutorial, we describe a generic Network sync setup. Your setup may differ, but the underlying principles remain the same.
-
We provide an advanced tutorial for triggers in a similar use case. See Frame Synchronization.
Broadsign Control offers a feature called Synchronization Set or Sync Set. Sync Set is defined in the Loop Policy properties in the Synchronization Tab.
A Synchronization Set segregates multiple distinct groups of synchronized players on the same subnet. Ideally, each group of synchronized players should operate on a different subnet to control UDP broadcast traffic. However, if this is not possible, you can configure the Synchronization Set to create virtual boundaries between player groups.
Synchronization Set names are case-insensitive, but they must be set identically on all Slaves and Masters within the same synchronized player group.
Compatibility and Player Configuration
Note: All Players in a Synchronization Set must be on the same major version to prevent synchronization issues. For example, they must all be v13.2 Players or v14.0 Players.
Players within the same synchronization set should reuse the same player configuration profile, while those outside that synchronization set should avoid doing so.
Using manual discovery for a large local network of screens may lead to excess traffic and increased bandwidth, impacting cost-efficiency. You could experience the following issues:
- Each Master player would have a direct TCP connection to every Slave player.
- Each Master player would send its triggers to every Slave player.
Since the list of Masters for manual discovery is set in the configuration of a player, each "sync set" should have its own configuration for its players. See Devices and Triggers Section.
Note: To use time-based synchronization effectively, a Network Time Protocol (NTP) client capable of syncing time very precisely is required.
Background
Players on a local network can all communicate with each other. However, there may be multiple "sync sets" within this local network, with multiple Masters, playing the same content. In order to prevent the Masters within these "sync sets" from triggering each others' Slaves by accident, we provide clients with the Synchronization Set feature. It causes Slaves to ignore triggers from Masters which are from different Synchronization Sets.
Ad Copy Audio Reverberation
Since hearing is more sensitive than sight in terms of synchronization in time, a minimum de-synchronization in audio is perceived as a reverberation. As a result, only the Master player or frame will output the ad copies audio layer in a synchronized environment.
Broadsign recommends to connect all the audio devices to the audio output of the Master player to avoid any reverberation.
Example 1
- Players A, B, C, D, E, F are in the same local network.
- Players A, B, C are in the same "sync set". Player A is the Master.
- Players D, E, F are in the same "sync set". Player D is the Master.
Result: Use the Synchronization Sets feature to prevent Slave players B and C from responding to triggers from Master player D, and to prevent Slave players E and F from responding to triggers from Master player A.
Example 2
- Players A, B, C are in the same local network.
- Players A, B, C are in the same "sync set". Player A is the Master.
- Players D, E, F are in the same local network (but not the same network as A, B, C).
- Players D, E, F are in the same "sync set". Player D is the Master.
Result The Synchronization Set feature is unnecessary.
Network Sync requires two loop policies: one for the Master player and one for all Slave players. The difference between each loop policy is the "synchronization" type.
To create the Master and Slave loop policies:
-
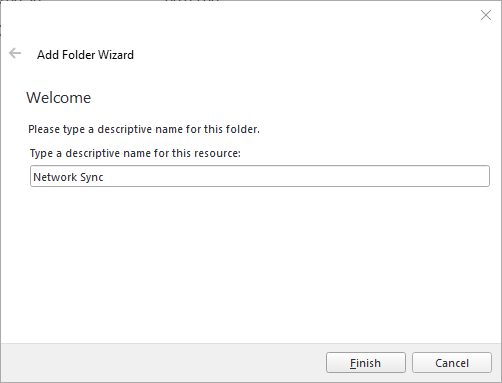
To keep things organized, for this tutorial we recommend you create a loop policy folder called "Network Sync".

-
In the Network Sync folder, add a loop policy called "Master".
- Set the Policy Settings to whatever you want. They are unimportant for this tutorial.
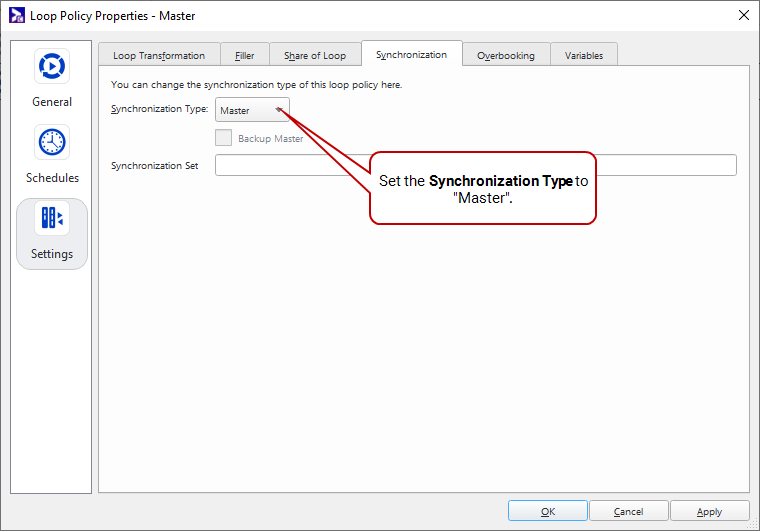
- Open the Loop Policy Properties. Go to Settings > Synchronization.
-
Set the Synchronization Type to "Master".

- In the Network Sync folder, add another loop policy called "Slave".
- In the Loop Policy Properties, set the Synchronization Type to "Slave".
For our example, we will need two display units: a Master and a Slave.
Note: You will need to define one player and assign it to the Master display unit. Associate any other players for synchronization to one or more Slave display units.
Note: This step describes how to create new display units. If you want to implement Network Synchronization on existing display units, you must go to the frames of those display units and set them to a Master/Slave loop policy. Frames are created within day parts, in the Frames tab of the Day Part properties dialog. For more information, see Frames.
To create the Master and Slave display units:
- To keep things organized, for this tutorial we recommend you create a display unit folder called "Network Sync".
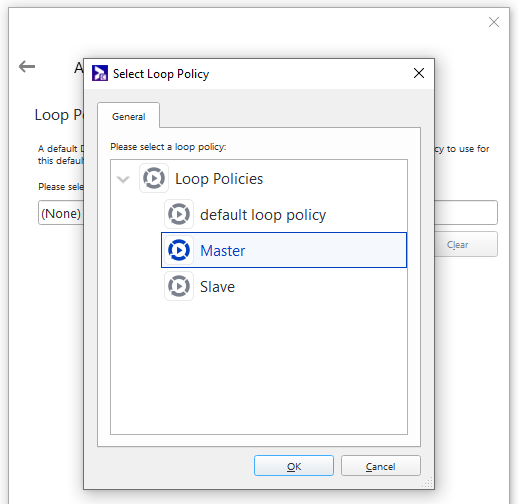
- In the Network Sync folder, create the Master display unit. Be sure to enter the following information:
- Welcome – Enter the name "Master".
-
Loop Policy – Select the "Master" loop policy you created in Step 1: Create Master/Slave Loop Policies.
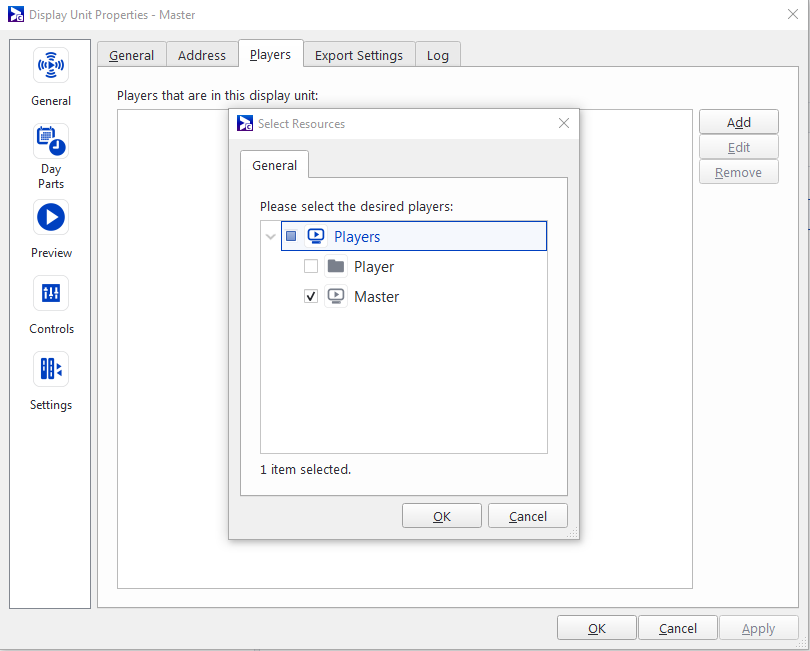
- Open the Display Unit Properties, and go to General > Players.
- Click Add, and select the player you have defined as the "Master" player.
- In the Network Sync folder, create the Slave display unit. Be sure to enter the following information:
- Welcome – Enter the name "Slave".
- Loop Policy – Select the "Slave" loop policy you created in Step 1: Create Master/Slave Loop Policies.
- Open the Display Unit Properties, and go to General > Players.
- Click Add, and select the players you have defined as the "Slave" players.
Network synchronization requires a configuration profile that provides the link between the Master display unit and the Slave display unit. It also specifies that the triggers will be live, so that Slave players will play specified content when they receive their triggers.
To create a configuration profile for Network sync:
-
Create a configuration. Enter the following information:
- Welcome – For this tutorial, name the configuration "Network Sync".
- Configuration Type – Select Player.
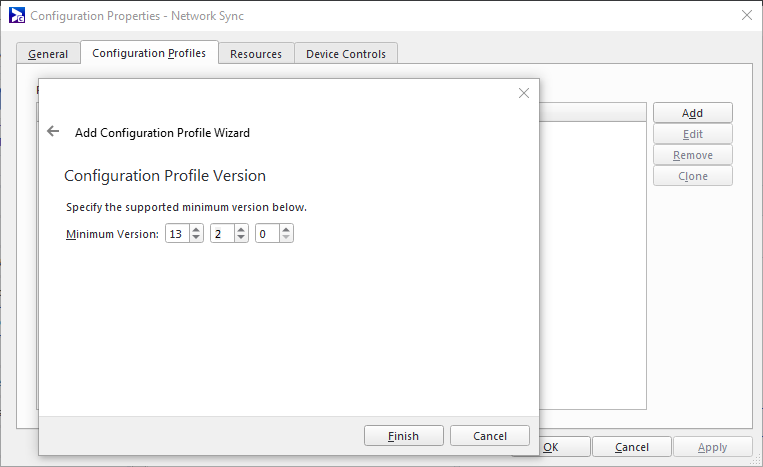
- Open the Configuration Properties, and go to the Configuration Profiles tab. Click Add.
-
Enter the following information:
- Welcome – Enter the name and version number of the player, for example, "Network Sync - Player v13.2".
- Configuration Profile Version – Set the version number that corresponds to your player, for example, "13.2.0".

-
Open the Configuration Profile Properties, and go to Devices and Triggers > Core.

-
In the Network Triggers section, configure the following:
- Network Triggers – Enable the feature.
- Network Synchronization Type – Set to "Master-Slave".
- Port – Leave at default "2325".
- Routing Scheme – UDP Broadcast
- Trigger Type – Select "Live".
- Click Apply.
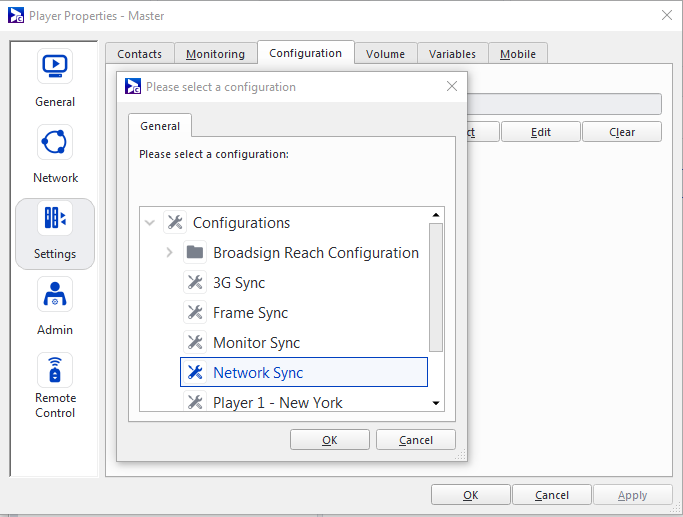
- In the properties of each player you need to synchronize, go to Settings > Configuration, and click Select.
- Add your new configuration profile.

This step describes how to book one or more campaigns for Network Sync.
The easiest way to execute Network Sync is to use a single campaign that plays on the Master and Slave display units. See Option A: Book a Single Campaign.
If you need to play two different campaigns on the Master and Slave display units, see Option B: Book Master and Slave campaigns.
The two main parts of this step are:
- Add the "Synchronization " (aka "Bundle Trigger Category ") page to the Add Campaign Wizard.
- Book a single campaign or multiple campaigns.
- From the Options menu, select Change Options.
- Go to Campaigns & Events > Wizard Options.
-
Select Synchronization.
-
This option will appear in the Add Campaign Wizard as "Bundle Trigger Category ".

-

-
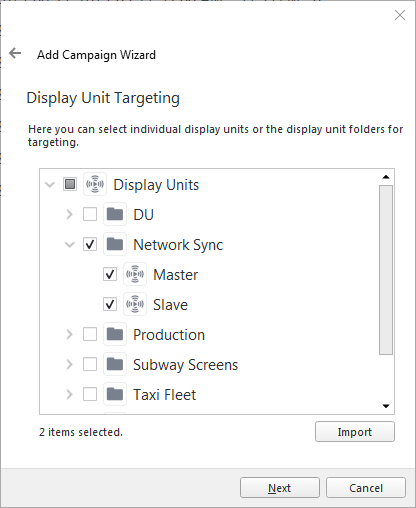
Add a campaign. Pay special attention to the following pages in the Add Campaign Wizard:
- Welcome – Name the campaign "Network Sync".
-
Display Unit Targeting – Select both Master display unit and Slave display unit to book your campaign to them (see Step 2: Add Display Units (Master/Slave)).

- Ad Copy Selection – Select the ad copy to assign it to the campaign. Ad copy duration is unimportant for player synchronization.
-
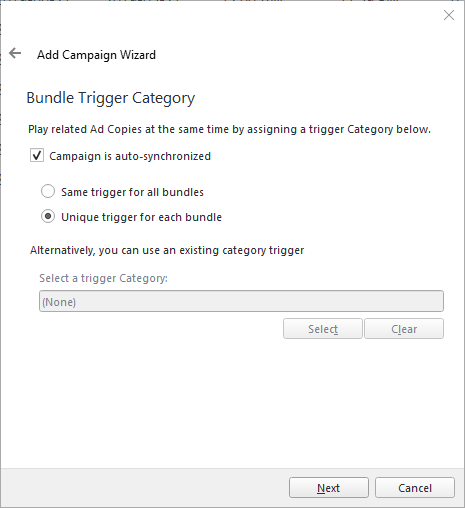
Bundle Trigger Category – Select Campaign is auto-synchronized. Also, for our example, we will select Unique trigger for each bundle.

Note: The Auto-synchronize bundles option can be found in the campaign's Trigger tab under the Media section (The Trigger Tab), as well as the bundle's Trigger tab under the Categories section (The Categories Section).
Finished! You have now set up a basic Network Sync network.
For our example, we will need one Master campaign. You can synchronize as many Slave campaigns as you want. To synchronize the campaigns, we will refer to the triggering content as the Master Campaign and the triggered content as the Slave Campaign. You must ensure that you assign the same trigger category to both campaigns.
Note: The process for creating each campaign is the same. The only differences are the names, the display units, and the ad copies.
The two main parts of this step are:
- Add a trigger to use in the Master and Slave campaigns.
- Book Master and Slave campaigns.
To add a Trigger:
- To keep things organized, for this tutorial we recommend you create a trigger folder called "Triggers - Network Sync".
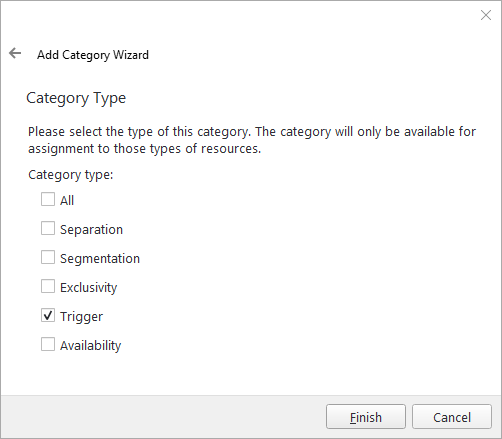
- In the Triggers - Network Sync folder, create the trigger. Be sure to enter the following information:
- Welcome – Enter the name "Network Sync".
- Category Type – Select Trigger, and unselect All.
- Click Finish.
To book Master and Slave Campaigns:
- Add a campaign. Pay special attention to the following pages in the Add Campaign Wizard:
- Welcome – Name one campaign "Master ", and all others in the network "Slave ".
- Display Unit Targeting – Select the Master display unit to book your Master campaign to it; select the Slave display unit to book any Slave campaigns to it (see Step 2: Add Display Units (Master/Slave)).
- Ad Copy Selection – If you want, you can select the same ad copy to assign it to each campaign, whether Master or Slave. Ad copy duration is unimportant for player synchronization.
- Bundle Trigger Category
- For each campaign, whether Master or Slave, ensure that Campaign is auto-synchronized is not selected.
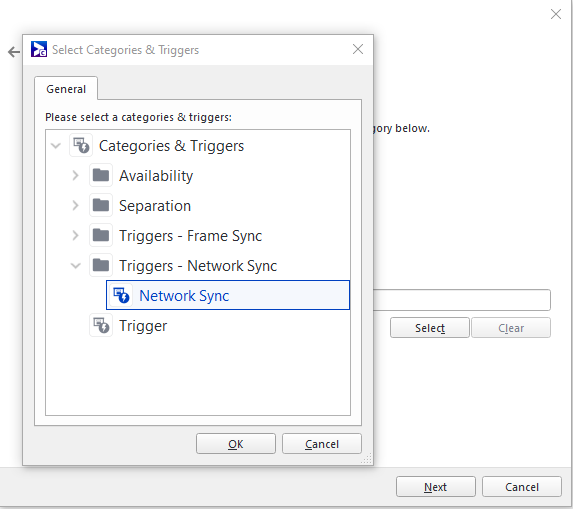
- Click the Select button and select the Network Sync trigger category for both the Master and Slave campaigns (the trigger that you have created earlier):

Finished! You have now set up a basic Network Sync network.

