
For digital out-of-home media owners who want to increase their organization’s profitability, Broadsign Reach is a programmatic DOOH sales platform that complements existing DOOH sales by automating ad sales transactions and helping publishers more effectively access digital online ad budgets and buyers. Broadsign Reach is natively integrated with Broadsign Control, providing greater control and transparency over programmatic sales transactions and ad delivery.
To see the product-specific documentation, go to the Broadsign Reach documentation.
This tutorial provides steps for setting up Broadsign Control Administrator and Broadsign Control Player to support your Broadsign Reach domain.
Note: If you have yet to get started with Broadsign Reach, please contact Broadsign Services.
Note: If you are already a Broadsign Reach client, then you have access to its product-specific documentation. This tutorial focuses only on those elements that require setup in Broadsign Control Administrator.
Prerequisites
Broadsign Reach requires that you be familiar with the following resources in Broadsign Control Administrator:
Workflow
In general, the workflow to enable Broadsign Reach in Broadsign Control Administrator is the following:
In order for Broadsign Control Player to grab content from Broadsign Reach, you need to configure your player.
To configure the player:
- Create a configuration.
-
Create a player configuration profile.
Note: Ensure that both your player and your player configuration profile are v12.0 or higher.
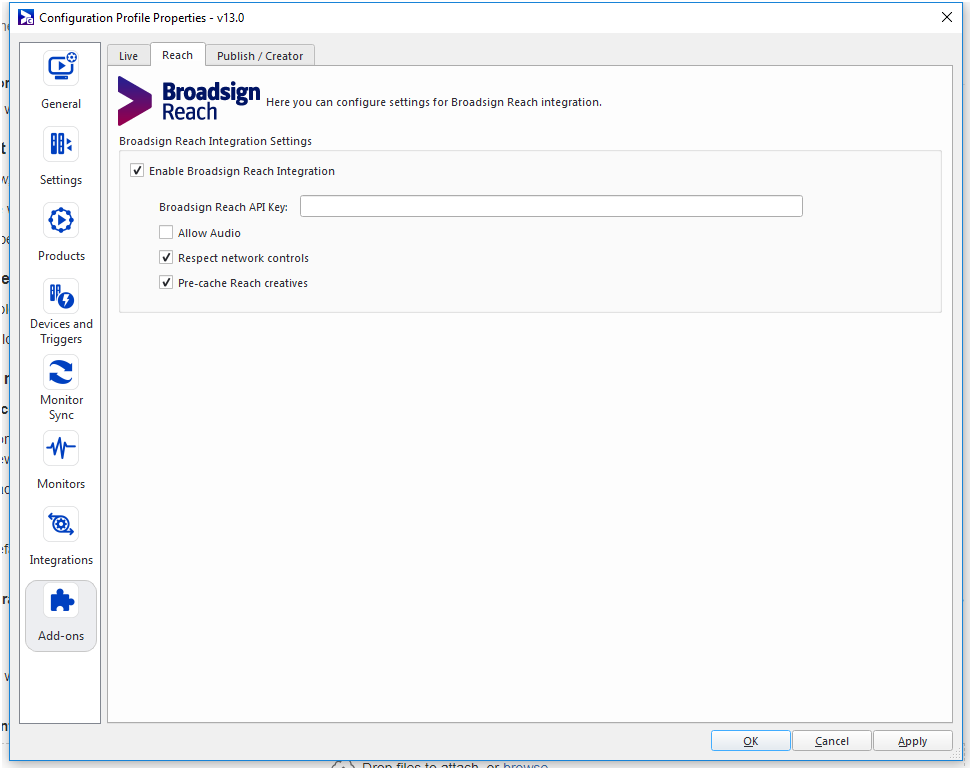
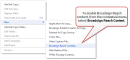
- Open the Configuration Profile Properties, and go to Add-ons > Reach. See The Reach Tab.
- Configure the Broadsign Reach settings. For our example, we will configure the following:
-
Select Enable Broadsign Reach Integration.
Note: If Broadsign has yet to enable this service on your domain, you will be unable to select this option.
- Enter your Broadsign Reach API key. For more details, see Find the Broadsign Reach API Key in the Broadsign Reach documentation.
- If you want to control audio at the ad copy level, select Allow Audio. See Step Two: Create Broadsign Reach Content.
- If you want Broadsign Control Player to respect existing network controls, select Respect network controls. See Network Control.
- If you want to allow pre-caching of approved Broadsign Reach creatives (ad copies), select Pre-cache Reach creatives.
- Click OK or Apply.
- In the Configuration Properties, go to the Resources tab.
- To associate this configuration to a player, click Add.
- From the Select Resources dialogue box, select the player or players that will play your programmatic Broadsign Reach content.

This player can now receive content from Broadsign Reach.
Broadsign Reach ad copies create a holding place which a DSP (demand-side platform) will fill during real-time-bidding. The creation of this ad copy is required for integration with Broadsign Reach.
For more information, see Broadsign Reach Content.
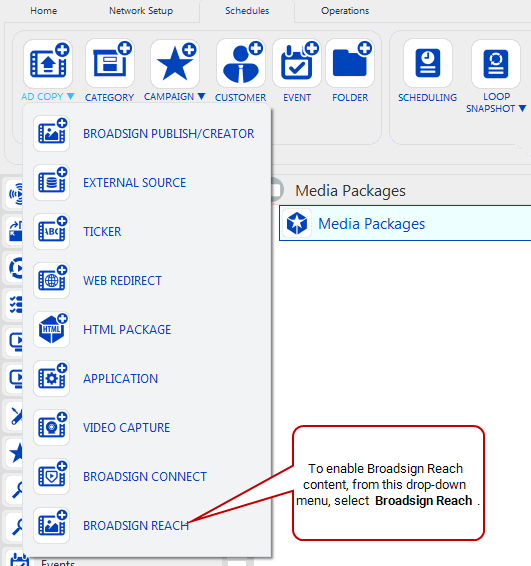
To add Broadsign Reach content:
To add Broadsign Reach content, use one of the following methods:
-
Go to the Schedules ribbon and select the arrow on the Ad Copy icon. Then, from the drop-down menu, select Broadsign Reach.

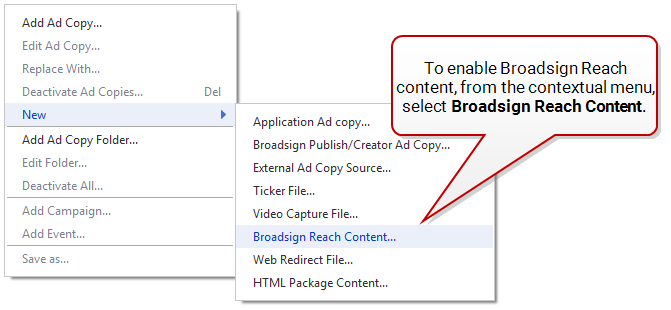
-
From the resource tabs on the left, select Ad Copies. Then, right-click anywhere in the work area. From the contextual menu, select New, then select Broadsign Reach Content.
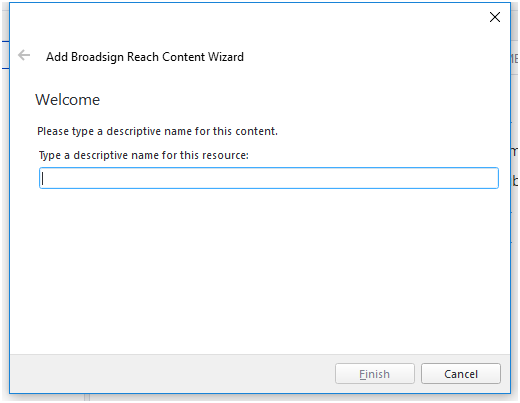
By default, the Add Broadsign Reach Content Wizard contains the following pages:
-
Welcome – Name the Broadsign Reach content.

In Broadsign Reach, the location of your screens and display units is very important. To save you time setting up your domain, you can bulk import display unit location data.
You will need to import .csv files containing the following information:
- Display Unit ID
- Display Unit Name
- Folder Name
- External ID
- Location Code
- Address (in Google format)
- Latitude
- Longitude
Ensure that your .csv files are in the following format:
[Display Unit ID#], [Display Unit Name], [Folder Name], [External ID#], [Location Code], [Address], [Latitude], [Longitude]Here is a sample .csv file:
4527458, JFK Terminal 1, Folder Name?, 6080, Location Code?, "705 Rue Sainte-Catherine, Montreal, QC H3B 4G5", 45.5027544, -73.5714715To bulk import display unit addresses:
Note: The process for exporting display unit addresses is basically the same. From the contextual menu, select Export Addresses.
- Select a display unit from your domain.
-
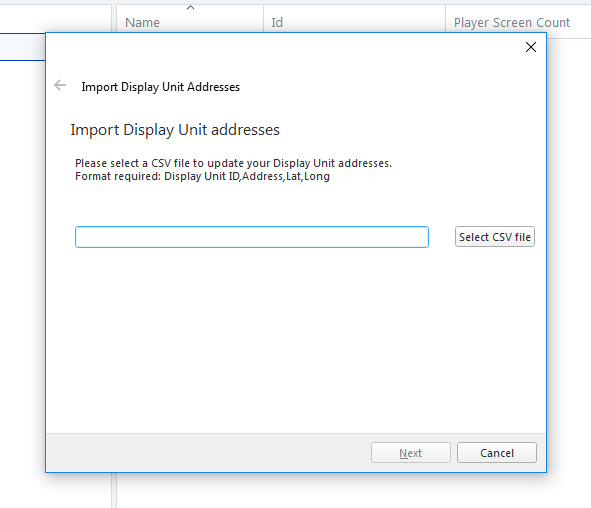
In the Work Area, right-click anywhere. The contextual menu appears. From the menu, select Import Addresses.
-
The Import Display Unit Addresses wizard opens. To import your .csv file, click Select CSV File.

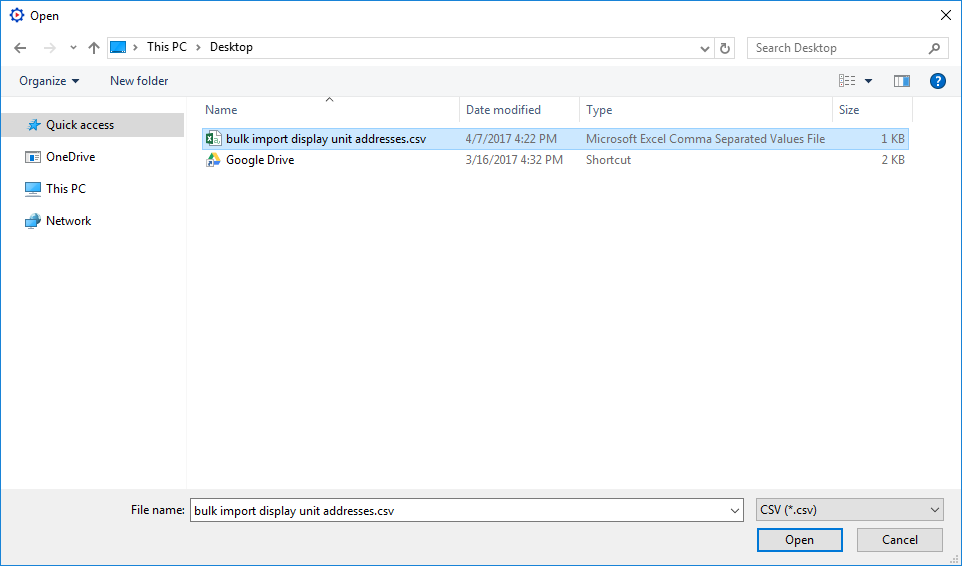
- Windows File Explorer opens.
- Click Open. On the Import Display Unit Addresses page, click Next.
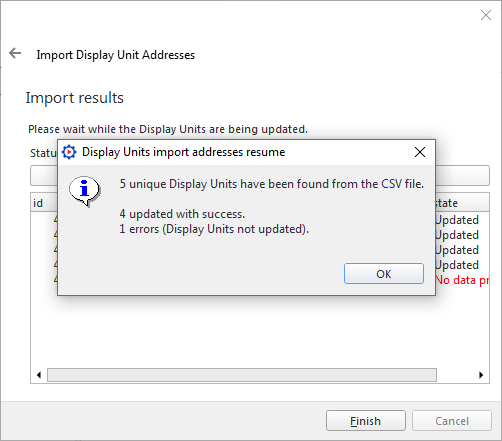
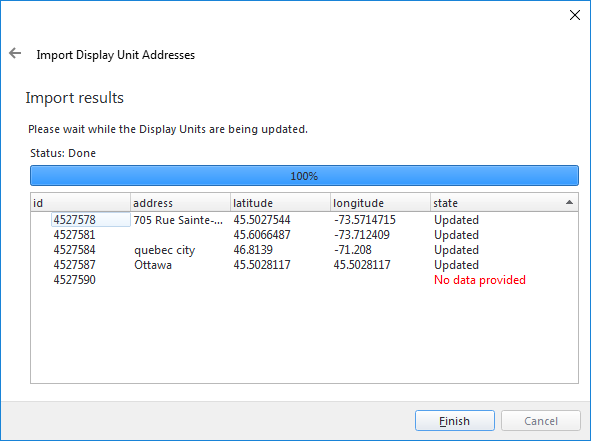
- In this example, of the five display units we tried to update, all but one were successful. For more details, click OK.

Navigate to the location of your .csv file.
The Import Results page appears, along with a status of the import.
Note: If you are a client of Broadsign Direct or Broadsign Reach, display units with complete address details (i.e., display unit ID#, address, latitude, and longitude) will appear in your domain.

